Transform Orders with DataMapper

Introduction
You are an integration developer at GlobalShip Warehousing. Two core systems need to talk to each other — an Order Management System that outputs PurchaseOrder XML and a Legacy Shipping Platform that only accepts ShipOrder XML. Right now, a team manually converts between the two formats using hand-maintained XSLT files. Every time a new carrier or delivery type is added, someone edits raw XSLT. It breaks. It takes days.
Your task: replace that manual process with a Camel integration built in Kaoto — no XSLT editing required.
The integration connects to these endpoints — all secured with Bearer token authentication:
| Method | Endpoint | Description |
|---|---|---|
GET | /oms/orders | Fetch list of PENDING order IDs |
GET | /oms/orders/{id} | Fetch PurchaseOrder XML for one order |
POST | /lsp/ship-orders | Dispatch ShipOrder XML to the shipping platform |
POST | /oms/orders/{id}/ack | Acknowledge the order as dispatched |
What You’ll Learn:
- Using DataMapper to translate between two XML schemas visually — no XSLT editing
- XPath expressions, constants,
copy-of, andfor-eachmappings in DataMapper - Building a two-route Camel integration in Kaoto
What You’ll Build:
A two-route Camel integration that polls the OMS for pending purchase orders, transforms each PurchaseOrder XML into the ShipOrder format required by the shipping platform, and dispatches the result — automatically, continuously.
Prerequisites
Before starting this workshop, ensure you have the following installed and configured on your system:
Required Software
- Visual Studio Code with the Kaoto Extension — VS Code Marketplace
- Podman or Docker — for running the mock server
- Java Development Kit (JDK) 17 or later
- JBang — jbang.dev
Required Knowledge
This workshop assumes you have:
- Basic understanding of integration concepts — familiarity with REST APIs and XML
- Basic command-line skills — ability to run Podman or Docker commands
- Familiarity with VS Code — basic navigation and file management
If you are new to Kaoto, complete the Listen to a Folder beginner workshop first. It introduces the Kaoto canvas, component configuration, and local route execution.
Project Setup
Create a new directory for the workshop and open it in VS Code with the Kaoto extension installed.
The OMS and shipping platform are simulated by a mock server — start it before continuing:
Podman:
podman run -p 8080:8080 quay.io/kaotoio/datamapper-workshop-app:latest
Docker:
docker run -p 8080:8080 quay.io/kaotoio/datamapper-workshop-app:latest
Wait for the following output:
🏭  Kaoto Workshop Mock Server
   Warehouse dashboard : http://localhost:8080/
   Dispatch dashboard  : http://localhost:8080/dispatch
   API base            : http://localhost:8080/

🔑  Bearer token (all /oms/*, /lsp/*, /svc/* calls): kaoto-workshop
Open both monitoring dashboards and keep them visible alongside VS Code:
- http://localhost:8080/ — Order backlog (OMS side)
- http://localhost:8080/dispatch — Dispatch queue (LSP side)
The order backlog is already populated with pending orders. New ones arrive automatically every few seconds.
Part 1 — Get the schemas
Schemas
On the Order Management dashboard (http://localhost:8080/), click ⬇ Download schemas.zip.
Unzip into your project folder:
kaoto-workshop/
└── schemas/
    ├── PurchaseOrder.xsd   ← OMS output format
    ├── ShipOrder.xsd       ← LSP input format
    ├── AccountInfo.xsd     ← enrichment services
    ├── BillingInfo.xsd     ← (not used in this tutorial)
    ├── LogisticsInfo.xsd
    └── StockInfo.xsd
✅ Checkpoint: kaoto-workshop/schemas/ contains 6 XSD files.
Part 2 — Set up the project in VS Code
- Open VS Code → File → Open Folder → select
kaoto-workshop/. - Confirm the Kaoto icon appears in the Activity Bar.
Create a new Camel Route named order-dispatch using the Kaoto view. See Managing Integrations if you need a step-by-step guide.
Kaoto generates a default route — you will replace its configuration in Part 3.
✅ Checkpoint: The Kaoto canvas is open with a new route.
Part 3 — Build the integration routes
The integration uses two routes:
- Route 1 — Polling: polls the OMS every 10 seconds, fetches the list of pending order IDs, and hands each ID off to Route 2.
- Route 2 — Processing: receives one order ID, fetches the full XML, transforms it, dispatches it to the LSP, and acknowledges the order.
Splitting into two routes keeps each one short and focused — enrichment steps can be added to Route 2 later without touching the polling logic.
Already comfortable with Kaoto routes? Paste the YAML below into your order-dispatch.camel.yaml to have the routes ready on the canvas — then read through the steps below to understand what each part does before moving to Part 4.
Route 1 — Polling
Step 3.1 — Polling trigger
The Kaoto canvas opens with a default route. Clean it up and configure the timer:
- Delete the placeholder steps (
SetBody,Log) — right-click each → Delete. Keep the Timer step. - Click the Timer step to open its properties panel and configure:
Property Tab Value Timer name Required tickPeriod All 10000
Step 3.2 — Fetch the order backlog
The OMS and LSP are secured systems — all API calls require a Bearer token. Set it once as an Authorization header at the beginning of Route 1 and it will be propagated to all subsequent steps, including Route 2.
Click + → search
setHeader→ select Set Header.Property Value Header name AuthorizationExpression type ConstantExpression Bearer kaoto-workshopClick + → search
http→ select HTTP.Property Value httpUri localhost:8080/oms/ordersHTTP method GETClick + → search
unmarshal→ select Unmarshal.Property Value Data format json
Step 3.3 — Fan out to Route 2
Split the JSON array so each order ID is processed individually, then hand it off to Route 2.
Click + → search
split→ select Split.Property Value Expression type SimpleExpression ${body}Click + inside the split → search
setHeader→ select Set Header.Property Value Header name orderIdExpression type SimpleExpression ${body}Click + inside the split → search
direct→ select Direct.Property Value Name process-order
✅ Checkpoint (Route 1): timer → setHeader(Auth) → HTTP GET → unmarshal → split → [setHeader(orderId) → direct:process-order]
Route 2 — Processing
Step 3.4 — Fetch the PurchaseOrder XML
The direct:process-order step in Route 1 references a route that doesn’t exist yet. Create it first:
- In the properties panel of the Direct step in Route 1, click Create route — Kaoto scaffolds the second route automatically with
direct:process-orderas its source.
This route receives one order ID in the orderId header each time Route 1 fires.
- Click + → search
http→ select HTTP. - In the properties panel, enable Dynamic — this switches the step from a static
toto a dynamictoD, allowing the URI to be evaluated at runtime. - Configure the properties:
Property Value httpUri localhost:8080/oms/orders/${header.orderId}HTTP method GET
The message body is now the raw PurchaseOrder XML.
Route 2 uses three HTTP steps with similar configuration. Instead of searching and configuring each from scratch, you can right-click an existing HTTP step on the canvas → Copy, then right-click the target position → Paste as next step. See Copy and Paste Nodes for details.
Step 3.5 — Dispatch to the shipping platform
- Click + → search
http→ select HTTP. - Keep the step as static (Dynamic disabled).
- Configure the properties:
Property Value httpUri localhost:8080/lsp/ship-ordersHTTP method POST
Step 3.6 — Acknowledge the order
The dispatch succeeded — now tell the OMS. This step must come last: if the dispatch failed for any reason, the ACK is never sent and the order stays PENDING in the OMS — ready to be picked up and retried on the next poll.
- Click + → search
http→ select HTTP. - In the properties panel, enable Dynamic (since the URI uses expression evaluation).
- Configure the properties:
Property Value httpUri localhost:8080/oms/orders/${header.orderId}/ackHTTP method POST
The OMS dashboard moves the order from 🟡 PENDING to ✅ DISPATCHED.
✅ Checkpoint (Route 2): direct:process-order → toD(fetch PurchaseOrder) → HTTP POST(ship-orders) → toD(ack)
Step 3.7 — Add the DataMapper transformation
The route dispatches orders — but the LSP receives raw PurchaseOrder XML which it cannot process. The LSP speaks ShipOrder, a completely different format. We need to transform the message between the two steps.
Add a DataMapper step between the PurchaseOrder fetch and the POST to the shipping platform. On the canvas, look for the + icon on the arrow between those two steps — if you used the skeleton YAML, that is the arrow between the first toD (fetch) and the to (ship-orders) in Route 2:
- Click the + on that arrow.
- Search
DataMapper→ select it. - Click the DataMapper step to open its properties panel, then click Configure — the DataMapper editor opens in a new tab and the XSLT file is created alongside your route.
New to DataMapper? See the DataMapper documentation for a full overview before continuing.
Part 4 — Map the fields in DataMapper
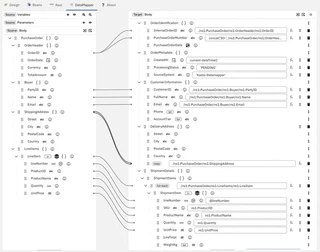
The OMS speaks PurchaseOrder. The LSP speaks ShipOrder. They have nothing structurally in common — different element names, different hierarchy, different namespaces. DataMapper is where you define the translation between them.
No XSLT editing. You drag, connect, and configure visually.
Step 4.1 — Load the schemas
Source (OMS output):
- Click + Add source document → select
schemas/PurchaseOrder.xsd→ root element:PurchaseOrder.
Target (LSP input):
- Click Set target schema → select
schemas/ShipOrder.xsd→ root element:ShipOrder.
For more information on loading and managing schemas, see Attaching Schemas.
✅ Checkpoint: Source tree on the left, target tree on the right.
Step 4.2 — Order identification
The LSP needs its own order reference. Drag to connect direct fields, and use the fx expression editor to build computed fields.
- Drag
OrderHeader/OrderIDfrom the source tree ontoOrderIdentification/InternalOrderIDin the target tree. - Drag
OrderHeader/OrderDatefrom the source tree ontoOrderIdentification/PurchaseOrderDatein the target tree. PurchaseOrderNumberis a derived field — the LSP requires it prefixed withSO-. Double-clickOrderIdentification/PurchaseOrderNumberin the target tree to open its inline editor, then click the fx button on the right side of the input field to open the XPath expression editor.- In the XPath editor catalog on the left, search for
concatand drag theconcat($arg1, $arg2, ...)function into the editor canvas. - Replace
$arg1with'SO-'and dragOrderHeader/OrderIDfrom the source document panel into the second parameter placeholder.
The resulting expression in the editor should look like:
concat('SO-', /*:PurchaseOrder/*:OrderHeader/*:OrderID)
The namespace prefix (ns0:, ns1:, etc.) depends on how the schema was loaded and may differ in your session. Using the wildcard prefix *: makes the expression work regardless of the prefix assigned.
For more information on drag & drop mappings and the XPath editor, see Creating Mappings and XPath Editor.
Step 4.3 — Processing metadata
The LSP requires status and audit fields on every incoming document. These are not in the PurchaseOrder — set them as fixed XPath string expressions.
Double-click each target field to open the input, then enter the value directly — string values must be wrapped in single quotes:
| Target | Value |
|---|---|
| OrderMetadata/ProcessingStatus | ‘PENDING’ |
| OrderMetadata/SourceSystem | ‘Kaoto-DataMapper’ |
| OrderMetadata/CreatedAt | (use fx) current-dateTime() |
String values must be wrapped in single quotes ('PENDING'). Numeric values like '9.99' in Step 4.8 are also passed as string/decimal constants and must be in quotes.
For more information on setting constants, see Creating Mappings.
Step 4.4 — Customer identification
The OMS PurchaseOrder carries buyer information directly — drag each source field onto its target. No expressions needed, these are direct mappings.
| Source | Target |
|---|---|
| Buyer/PartyID | CustomerInformation/CustomerID |
| Buyer/Name | CustomerInformation/FullName |
| Buyer/Email | CustomerInformation/Email |
Step 4.5 — Delivery address
ShippingAddress in PurchaseOrder and DeliveryAddress in ShipOrder are structurally identical — same four fields, same types. Use the copy-of pattern to copy the entire block in a single rule instead of mapping fields one by one.
- Click the
DeliveryAddresstarget node → Set mapping type → copy-of. - Select
ShippingAddressas the source.
All four address fields (Street, City, PostalCode, Country) are covered by this single mapping rule.
copy-of and namespaces: In XSLT, copy-of copies the source element subtree including its tag name and source namespace (ShippingAddress). While in strict production XSD schemas with different namespaces you would typically map fields individually or use canonical schemas, copy-of is used here to demonstrate quick block mapping in DataMapper. The workshop mock server handles this payload seamlessly.
Step 4.6 — Line items
Drag the LineItem source node onto the ShipmentDetails/ShipmentItem target node — DataMapper automatically creates a for-each loop that iterates over all items. Then map the individual fields inside:
| Source | Target |
|---|---|
| LineItem/ProductID | ShipmentItem/SKU |
| LineItem/ProductName | ShipmentItem/ProductName |
| LineItem/Quantity | ShipmentItem/Quantity |
| LineItem/UnitPrice | ShipmentItem/UnitPrice |
| OrderHeader/TotalAmount | ShipmentDetails/TotalValue |
TotalValue is mapped outside the for-each loop — it is a single value from the order header, not per line item.
Step 4.7 — Carrier assignment
DeliveryMethod is declared abstract="true" in the schema — the shipping platform cannot accept the abstract element, only a concrete subtype. Pick one now:
- Right-click the
CarrierSelection/(abstract)node in the target tree. - DataMapper shows a type picker dropdown — select
StandardDelivery. - Set the one required sub-field:
| Target | Value |
|---|---|
| StandardDelivery/MethodCode | ‘STD’ |
The abstract node appears as (abstract) in the target tree — it is a placeholder until you select a concrete subtype. Selecting a type here tells DataMapper which concrete element to output.
Step 4.8 — Shipping costs
One required field for now — the base cost.
| Target | Value |
|---|---|
| ShippingCosts/BaseShippingCost | ‘9.99’ |
Step 4.9 — Save the mapping
DataMapper continuously updates the XSLT file as you work. Press Ctrl/Cmd + S to make sure the latest state is saved and flushed to disk before closing the editor.
You can save at any time during mapping (using Ctrl/Cmd + S or the editor’s save action) to ensure your changes are written to the underlying .xsl file incrementally.
✅ Checkpoint: The generated XSLT file exists in the kaoto-workshop/ folder (e.g. order-dispatch.xsl). Its content should match the following structure:
<?xml version="1.0" encoding="UTF-8"?>
<!-- This file is generated by Kaoto DataMapper. Do not edit. -->
<xsl:stylesheet xmlns:xsl="http://www.w3.org/1999/XSL/Transform" version="3.0"
  xmlns:xs="http://www.w3.org/2001/XMLSchema"
  xmlns:fn="http://www.w3.org/2005/xpath-functions"
  xmlns:ns0="http://www.kaoto.io/shiporder"
  xmlns:ns1="http://www.kaoto.io/purchaseorder"
  exclude-result-prefixes="xs fn ns0 ns1">
  <xsl:output method="xml" indent="yes" omit-xml-declaration="yes"/>
  <xsl:template match="/">
    <ShipOrder xmlns="http://www.kaoto.io/shiporder">
      <OrderIdentification>
        <InternalOrderID><xsl:value-of select="/ns1:PurchaseOrder/ns1:OrderHeader/ns1:OrderID"/></InternalOrderID>
        <PurchaseOrderNumber><xsl:value-of select="concat('SO-',/ns1:PurchaseOrder/ns1:OrderHeader/ns1:OrderID)"/></PurchaseOrderNumber>
        <PurchaseOrderDate><xsl:value-of select="/ns1:PurchaseOrder/ns1:OrderHeader/ns1:OrderDate"/></PurchaseOrderDate>
      </OrderIdentification>
      <OrderMetadata>
        <CreatedAt><xsl:value-of select="current-dateTime()"/></CreatedAt>
        <ProcessingStatus><xsl:value-of select="'PENDING'"/></ProcessingStatus>
        <SourceSystem><xsl:value-of select="'Kaoto-DataMapper'"/></SourceSystem>
      </OrderMetadata>
      <CustomerInformation>
        <CustomerID><xsl:value-of select="/ns1:PurchaseOrder/ns1:Buyer/ns1:PartyID"/></CustomerID>
        <FullName><xsl:value-of select="/ns1:PurchaseOrder/ns1:Buyer/ns1:Name"/></FullName>
        <Email><xsl:value-of select="/ns1:PurchaseOrder/ns1:Buyer/ns1:Email"/></Email>
      </CustomerInformation>
      <DeliveryAddress>
        <xsl:copy-of select="/ns1:PurchaseOrder/ns1:ShippingAddress"/>
      </DeliveryAddress>
      <ShipmentDetails>
        <ShipmentItems>
          <xsl:for-each select="/ns1:PurchaseOrder/ns1:LineItems/ns1:LineItem">
            <ShipmentItem>
              <xsl:attribute name="lineNumber"><xsl:value-of select="@lineNumber"/></xsl:attribute>
              <SKU><xsl:value-of select="ns1:ProductID"/></SKU>
              <ProductName><xsl:value-of select="ns1:ProductName"/></ProductName>
              <Quantity><xsl:value-of select="ns1:Quantity"/></Quantity>
              <UnitPrice><xsl:value-of select="ns1:UnitPrice"/></UnitPrice>
            </ShipmentItem>
          </xsl:for-each>
        </ShipmentItems>
        <TotalValue><xsl:value-of select="/ns1:PurchaseOrder/ns1:OrderHeader/ns1:TotalAmount"/></TotalValue>
      </ShipmentDetails>
      <CarrierSelection>
        <StandardDelivery>
          <MethodCode><xsl:value-of select="'STD'"/></MethodCode>
        </StandardDelivery>
      </CarrierSelection>
      <ShippingCosts>
        <BaseShippingCost><xsl:value-of select="'9.99'"/></BaseShippingCost>
      </ShippingCosts>
    </ShipOrder>
  </xsl:template>
</xsl:stylesheet>
The namespace prefixes (ns0:, ns1:) in your generated file may differ — this is normal and depends on how the schemas were loaded.
Part 5 — Run the integration
- In the Kaoto Integrations view (left sidebar), locate the
order-dispatchintegration. - Click the ▶ Run button next to it.
For run options, executor settings, and stopping a running integration, see Executing Integrations.
Switch to your browser and watch both dashboards.
Order Management dashboard (http://localhost:8080/) — orders move through the pipeline:
🟡 PENDING → 🔵 PROCESSING → ✅ DISPATCHED
Dispatch dashboard (http://localhost:8080/dispatch) — the shipping platform starts receiving orders:
| Customer | Carrier | Container |
|---|---|---|
| John Smith ✅ | StandardDelivery | ⚠️ missing |
| Acme Corp ✅ | StandardDelivery | ⚠️ missing |
Customer names resolve correctly from the PurchaseOrder. Container type is blank — that field requires enrichment from the StockInfo service, covered in the next tutorial.
✅ Checkpoint: Orders are dispatched. The Dispatch dashboard is populated with correct customer names.
What we built
The integration polls the OMS every 10 seconds, transforms each PurchaseOrder into ShipOrder format using a visual DataMapper mapping, and dispatches it to the shipping platform — automatically, continuously.
| ShipOrder field | Source |
|---|---|
| InternalOrderID | PO/OrderHeader/OrderID |
| PurchaseOrderNumber | concat(‘SO-’, OrderID) |
| ProcessingStatus | ‘PENDING’ |
| SourceSystem | ‘Kaoto-DataMapper’ |
| CreatedAt | current-dateTime() |
| CustomerID | PO/Buyer/PartyID |
| FullName | PO/Buyer/Name |
| PO/Buyer/Email | |
| DeliveryAddress | copy-of PO/ShippingAddress |
| ShipmentItems | for-each PO/LineItem |
| DeliveryMethod | StandardDelivery |
| BaseShippingCost | ‘9.99’ |
What’s next
The core integration works — orders flow, fields are mapped, the shipping platform receives valid ShipOrder XML.
For now, explore what you’ve built: tweak a mapping in the DataMapper, add a different carrier type, or open the generated XSLT file to see what the visual mapping produced under the hood.
A follow-up tutorial is coming that takes this integration further — enriching each order with live data from four additional services, dynamic carrier selection, and exporting everything as a Quarkus application. Stay tuned.
Troubleshooting
401 Unauthorized
All four HTTP steps need Authorization: Bearer kaoto-workshop — the orders list fetch, the individual order XML fetch, the shipping POST, and the final OMS ACK POST. Check each step in the properties panel.
DataMapper schema tree is empty
Open DataMapper, click + Add source document, and select the XSD from the schemas/ folder using the file browser — not a URL.
Orders stay PENDING indefinitely A mapping error in the generated XSLT is the most common cause. Re-open DataMapper and check for unmapped required fields (marked red). Save again to regenerate the XSLT.
order-dispatch.xsl is empty or missing
Press Ctrl/Cmd + S explicitly inside the DataMapper editor window before closing it.
Additional Resources
- Kaoto Documentation — Kaoto user guide and reference
- Apache Camel YAML DSL — YAML DSL reference
- Apache Camel Simple Language — expression language reference
- Enterprise Integration Patterns — EIP reference
